Python Development
Python Development
This guide is currently a work-in-progress.
Python is mainly used at WSDOT in association with ArcGIS software.
Using multiple Python environments
The various different ArcGIS software products each use their own specific versions of Python.
| ArcGIS Product | Python Version | bitness |
|---|---|---|
| ArcGIS Desktop | 2.X | 32-bit |
| ArcGIS Desktop (Background Geoprocessing) | 2.X | 64-bit |
| ArcGIS Server | 2.X | 64-bit |
| ArcGIS Pro | 3.X | 64-bit |
Once you have completed the setup steps in the Setup section below, you can use the Python Launcher for Windows to choose between the different Python 2.X versions associated with the non-Pro ArcGIS software and use propy.bat to use the Python 3 environment that is installed with ArcGIS Pro.
Setup
- Install the ArcGIS software you want to use.
- Install the latest version of Python 3 (64-bit) using an installer downloaded from python.org. Only the installers from the official python.org site seem to include the Python Launcher for Windows, which you will need to launch the various versions of Python. (Note that you can change these options after installation using the Add / Remove Programs control in Windows using the Modify option with Python.)
- Run the installer file.
- Check the Install launcher for all users checkbox.
- Check the Add Python 3.X to PATH checkbox. (The X will actually be a version number.)
- Click the Customize Installation button (rather than Install Now).
- Make sure the py lancher and for all users option, then click the Next button.
- Make sure the following options are checked:
- Install for all users
- Associate files with Python (requires the py launcher)
- Create shortcuts for installed applications
- Add Python to environment variables
- Click the install button.
- Add the following folder to your system’s PATH variable (assuming ArcGIS Pro’s default install location):
C:\Program Files\ArcGIS\Pro\bin\Python\Scripts. Make sure this folder is listed after the two folders that were added to thePATHby the Python 3 installer from python.org. This step allows you to use the ArcGIS Pro Python environment by usingpropy.bat.
Using the Python Launcher
The Python Launcher for Windows is called from the command line using the py command.
List Python installations
The command below will output all Python environments available to the Python Launcher. (As ArcGIS Pro installs its Python in a location that is not detectable to the Python Launcher, you must use propy.bat instead of py.)
py -0p
The output of the above command will look similar to this.
Installed Pythons found by C:\WINDOWS\py.exe Launcher for Windows
 -3.7-64        "C:\Program Files\Python37\python.exe" *
 -2.7-64        C:\Python27\ArcGISx6410.6\python.exe
 -2.7-32        C:\Python27\ArcGIS10.6\python.exe
The table below describes what is listed in the sample command output.
Instead of python use… |
Python version | Bitness | Path | Is Default |
|---|---|---|---|---|
py -3.7-64 |
3.7 | 64 | C:\Program Files\Python37\python.exe |
Yes |
py -2.7-64 |
2.7 | 64 | C:\Python27\ArcGISx6410.6\python.exe |
No |
py -2.7-32 |
2.7 | 32 | C:\Python27\ArcGIS10.6\python.exe |
No |
Column descriptions
- Shows which flag you would use immediately after the
pycommand to specify which version of Python to run. - Version of Python. The number before the period is the “major” component. Following the period is the “minor” component.
- “bitness”: whether it is a 32- or 64-bit version of Python.
- Path: location of the Python executable.
- The default Python will be used if no version info is specified via a flag. (There can be only one. ⚔)
Recommendations
- Write Python code to work with both Python 2.x and Python 3.x by following these guidelines.
- Use argparse module when creating command-line tools. If your module contains a script called
__main__.pythen it can be run from the console usingpython -m. - Document function parameter and return types using
# type:comments. - Include the following line to force Python 2.x to behave like Python 3.x.
from __future__ import absolute_import, division, print_function, unicode_literals
Recommended Tools
Visual Studio Code
Helpful extensions
- Python Extension
- gitignore extension - Used for easily creating a
.gitignorefile for Python development.
Selecting an environment
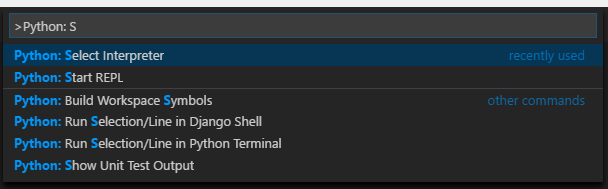
- Press either F1 or Ctrl + P to bring up the Command Palette (or select Command Palette… from the View menu)
- Begin typing
Python: Select Interpreterand select that option from the drop down when it becomes visible. - Select one of the environments that contains the text “ArcGIS” in its path.

Tools installed as Python packages
These linting tools can be installed via pip. Alternatively, some can also be installed via Conda.
(These linting tools are not strictly required for development, but Visual Studio Code will keep nagging you if you don’t have them. You’ll either need to turn off these messages or install the tools to make the messages stop appearing.)
Starting a new project
- Create a new folder.
- Open the folder in Visual Studio Code.
- From the Command Pallette, select Add gitignore and then Python to generate a new
.gitignorefile. - Set up the folder structure described in Extending geoprocessing through Python modules.
Pylint configuration
Pylint will not recognize some arcpy classes or properties and you will need to modify the generated-members section of your .pylintrc file. (Examples)